Another Halloween, another set of homemade costumes!!
I think I may have done a better job with
last years creations, but I still had fun creating their character costumes this year.
Bayne wanted to be Future Trunks from Dragonball Z.
Here is a look at his character:
Here are the materials I was working with. A hand-me-down mens shirt and jean jacket.

I used one of Bayne's tank tops to cut out a pattern for his costumes tank top. I didn't document any of the shirts transformation, but basically I just cut out the front and back using the tank top as a pattern guide. I flipped the print to the inside, so it wouldn't show. I used the existing hem line from the original shirt and just serged the sides together. For the neck and arm holes, I used the remaining scraps from the sides to create a trim to finish the edges.
The jean jacket I cut and then hemmed the bottom of the top piece.
Then I dyed it blue!
Dye, dye, dye!!!
Then I dyed his hair purple with temporary hair color.
Dye, dye, dye!!!
Here is the finished costume:

I kept feeling like something was missing and I totally realized what it was as soon as halloween was over.
The belt.
I forgot to make the belt.
I think that would have helped the costume out a bit.
Either way, the character is a bit obscure and most people aren't going to know who he was anyway.
Bayne loved it and that is all that mattered.
Aubrey wanted to be a ninja. Not just any old ninja, but an apple ninja. What is an apple ninja, you ask? Well, I have no idea.
I think she decided apple ninja because her friend was going to be a banana and I think she told her she would be an apple, but she really wanted to be a ninja, so she merged the two ideas. She tells me its because her ninja costume would be too scary, so she needed to have a cute apple on the back to make it look less scary.
Whatever.
Even though it made no sense, I wanted to bring her idea to life, regardless.
The photo above is an idea of what I was going for, but I wanted her to have a regular karate belt.
I used this robe pattern to help form the Gi top.
I had to make a few adaptions to the pattern as I went along.
Here is the finished product:
I got the sword, nunchucks, and mask at the $1 store. I had both fabrics laying around in my stash, so that didn't cost a dime. I kinda winged my way through the hood using one of the hoods from her jackets as a template.
Doesn't she look intense?!?!
But wait ... then she turns around and there is a cute little apple whose happy to see you :)
I made that with felt I had lying in my stash. I figure it is like the bonsai tree on the back of the Karate Kids Gi. It's her little symbol.
She seemed pleased with the outcome.
For myself, I decided to break away from my devil or witch costumes that I rotate through each year for many years now. I found some leopard ears, tail, and bow tie at the $1 store and decided to grab those, since I knew I had some left over leopard fabric at home.
I used pattern B to make the skirt. I adapted it a little by placing the zipper in the back instead of the side. For the life of me, I cannot remember why I decided to do that. Maybe I was limited by the amount of fabric I had? I have no idea. Luckily it worked out, but I think I will be keeping my zippers on the side from here on out.
After finishing the skirt, I decided it needed to have a crop top black shirt to go with the high waisted skirt. As if I didn't have enough to do ... but when I get a vision, there is no stopping me from trying to bring it to fruition.
I had taken a before picture of the shirt, but I cannot find it anywhere. I must have deleted it by accident. Basically it was a XL mens black shirt.
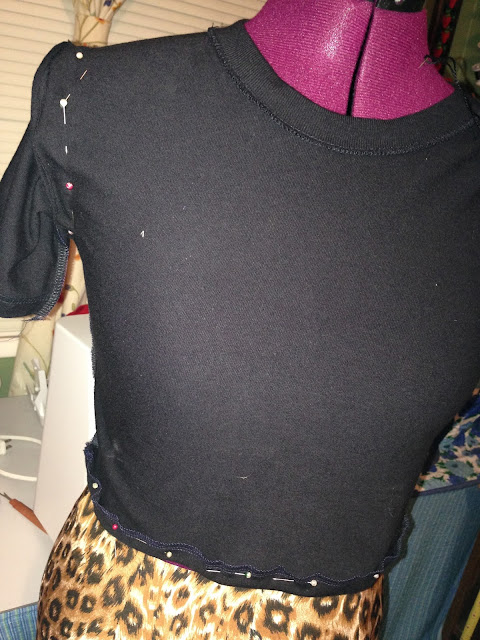
As you can see, I cut off the sleeves, opened up the sides, and cut a bunch off the bottom.
Then I pinned it inside out to the dress form to get a good fit.
I used the original sleeves to make the new sleeves, but cutting them down and sewing them back together.
I pinned the sleeves to the arm holes pulling up all the slack as I went and serged them on.
Then finished the bottom hem.
Here is a look at the finished pieces:
Here we are all dressed up and ready for the schools Halloween Parade!!
A nice little practice run before the big day.
Finally, the big day arrived and we were ready for showtime. What a motley crew we make!
All and all I think the costumes came together pretty well. The boys had a great time trick or treating. Aubrey did for a little bit, but her tummy was bothering her, so she gave up on knocking on doors pretty early on. It seems like one of my kids is always sick on Halloween. Not even a ninja can fight off an illness, I guess.
I hope you all had a wonderful time this Halloween, too!


