Friday, December 2, 2016

Sunflower, Elephants, and Mistakes

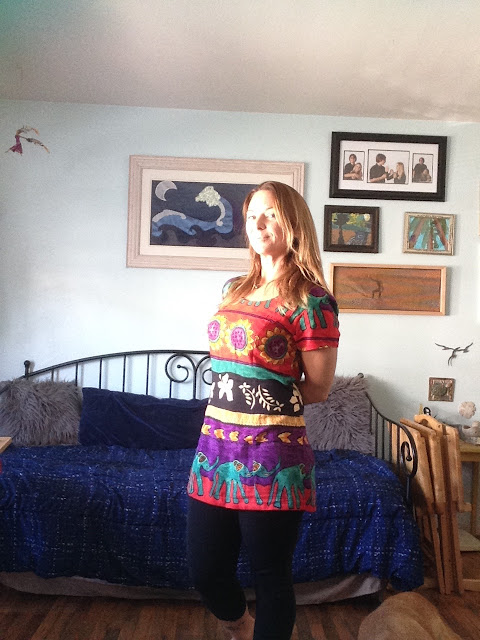
My mother-in-law sent this dress that she found at her local thrift store.  


I loved the vibrant pattern of the fabric.  I wasn't so keen on the shoulder pads and extra wrap around skirt.  This had easy, wearable refashion written all over it!


I figured all I would need to do is take out the shoulder pads, remove the wrap, take in the sides to hide the seam from the wrap, and hem it at the line right below the elephants.  Boom!  Done!  Brand new, cute dress for Erinn.
Except it's Erinn.
And when Erinn thinks its an easy project she breezes through hastily and makes really stupid, unnecessary mistakes that end up turning a really simple project into a huge pain in the ass.
Erinn knows this.
Erinn tells her this every time!
Erinn still doesn't listen.  
Erinn doesn't slow down.
Erinn made a mistake.
Erinn cut across the little line to raise the hem and somehow caught some of the fabric on the other side of the dress.  It cut much higher than the line below the elephant. 
Erinn is not a quitter, though!

As you can see I did complete the dress.
There were a series of mishaps I don't care to relive.
I added a band that I patched together out of the wrap and bottom piece of the skirt.
I sewed it on.
It was too long, so I hemmed it at the seam where I joined the fabrics.
It looked great until I lifted up my arms.
Too short.  AGAIN.
I put on leggings.
I win!  Its done.  
And I actually think I like it and will wear it...


...With LEGGINGS!
P.S.  I literally just made the same hasty mistake with my next refashion.  This time it was a bodice and a serger blade.  Ugh.  Will she ever learn??


Tuesday, November 29, 2016

Halloween Costume Refashions and Creations

My kids always like to pick impossible characters to be for Halloween.  The ones you either cannot find at the Halloween Superstores that pop up everywhere, but you can find on amazon for $375 ... for an adult size costume.  Lucky for my kids, they have a mom who is up for the challenge of making their costume dreams come true on a dime store budget.  

My daughter wanted to be Peridot from Steven Universe.  


Lord help me!

I prayed as I went digging into my collection of old clothes I have saved for refashions and found some perfect shirts that would work for her outfit.  I did have to go to the thrift store and buy one extra shirt to finish the top, but her outfit is made completely from old shirts.


I had to go to Joann to find material for her hat, but I scored this vinyl, pleather stuff off of the remnant rack for 50% off.  I sewed a bendable wire into the seam along the edges to keep it upright.
Here is my little Peridot!


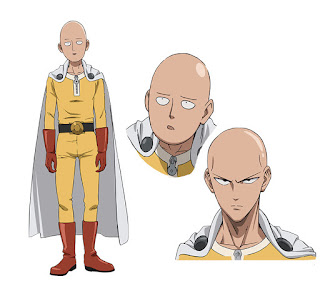
My son wanted to be One Punch Man from One Punch Man.  Seems obvious, I know, but I had no idea who the hell One Punch Man was until now.  It's an anime, this guy below is in it, and he punches really hard.  There, now you know as much as I do about him ;).

In my fabric stash I had some of this cheap, polyester fabric that screamed, "Halloween is all I'll ever be good for!"  Unfortunately, I didn't have enough to cover both pants and a top because for some reason my son has suddenly become a GIANT!!!  Wasn't he just 4?!  Anyway, I had to buy a little more yellow for the top.  I used felt that I had in my stash for the gloves, boots, and cape.


We tried to get a bald cap.  He looked like a condom ... lol.
We tried to sew him a skin color beanie.  He wasn't feeling it.
He went as One Punch Man with hair.  
Here he is!


He will be 12 in just a couple weeks.  I love seeing him still embrace the child inside and dress up in costume.  He even wore the outfit to middle school for the whole day.  I have to wonder, how many more years of magic will Halloween hold for him?  I have treasured every one!


We really wore the heck out of these costumes this year.  School celebrations, carnival, halloween parties, and Trick or Treating.  
Good times!

Monday, November 28, 2016

Little Red Floral Dress

Hello everyone!

This is just a quick look at a dress I made out of some thrifted fabric I received.

I love this pattern.  I have used it so many times.


Here is the dress I made using pattern B.  I shortened it a little.


I love the floral fabric.  For some reason I don't love how it looks on.  I haven't really had chance to wear it out yet either.  I think it might be the cut of the skirt that bothers me.  I may go back, take out the hem, and try to even it out a little more.  It feels like it goes up a little to high on the sides and a little, too low in the front and back.  It makes it feel lopsided to me. I hope it doesn't make it too short if I do.  It's funny how picky you can be about something so little when you make a garment yourself.  

I think I might go pull that out of my closet and put it on my sewing table right now ... too be continued.

Friday, July 22, 2016

Daddy's Clothes Become Son's - A First Birthday Gift

A good friend of mine had a his first child a year ago.  He works in wardrobe, so he always gives me cool clothes and materials to work with.  I wanted to make him something nice for his son's first birthday.

I decided to create it out of his old clothes.
I forgot to take a pic before I cut into it, but I took one of his old western style shirts ...


And one of his old black t-shirts (size mens large).


I used this pattern. 
I had to size it down even more, though because I needed something for 18mths and I think this is size 2 and up.


I took the western shirt and turned it into pants and the t-shirt I sized way down using all the existing hem lines from the sleeves and the bottom.  I also cut out the original neck line and sized it down and re-attached it to the shirt.  I added a little bleach design of a body boarder to the front because he is a great body boarder and I know he wants his son to follow in his footsteps.  I'm pretty sure this will be his first body boarder shirt, since they don't make them this small. :)


I thought the pockets would look super cute on his bum. :)


My friends birthday is just a few weeks after his son's, so I decided to make dad a matching shirt.

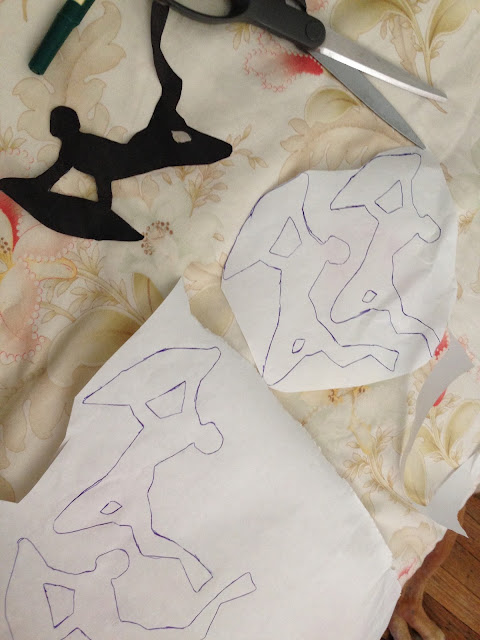
To make the bleach design I use freezer paper.  I have started doubling up the freezer paper to prevent the bleach from bleeding through the paper and ruining the negative image.  


You iron on the freezer paper, one and then the other on top.  Let it cool.  Put some cardboard inside the shirt to keep the bleach from leaking through the back and then spray it with bleach.  I just use my bleach cleaning spray.  You want to spray it enough, but not over saturate it.  Only four good sprays should do.  Then blot the paper dry and peel it off quickly without getting bleach onto the design under the paper.  Let it air dry.


For some reason when I did this shirt it didn't bleach well, so I had to do it twice.  It bleached a little too well the second time, but I think I was a little heavy handed with the spray.  I prefer the orange look I got with the little shirt, but this is still cool.  I'm not to sure he will wear it, but he can at least use it at home as leisure wear if he doesn't want to go twinsy with his son.


Saturday, July 16, 2016

Men's Jeans to Women's High Waisted Skirt

I have been wanting to make a high waisted jean skirt to wear with another refashion I made not too long ago.  This Boho-Beachy Shirt was calling for one since the day I made it.  I honestly haven't even worn it yet, even though I love it, but that's about to change.

Here are the jeans I chose to work with.  They are a mens pair.  I cut off the legs.


One leg would become the front and the other the back.


I love this pattern.  I use this to make all my skirts.  It is easy and the fit is great.


I got the skirt all put together.  Looks good, right?


It does, until you turn it to the side.  I'm no skinny little wafe, so the width of my hips is much greater then the size of the thighs of the jeans I am working with.  

(Any big boys out there want to donate your old jeans ;) :)???  The bigger the better!!  I'll take any size!!  Size does not matter :))


That's ok, though.  This is part of the plan for this skirt.  I wanted to tie in the octagon shapes from the boho top to the skirt.  I found my old template and started cutting these shapes from my sons old jeans, so they have a different shade/color.


I started at the top and worked my way to the bottom.  

Today's project was fueled by coffee and 'I Love Lucy'.


Here is the front view after pinning both sides.


Then the tricky part ... 
I had to sew it all together with all these pins in place.  I stabbed myself more times than I could count trying to push this through the machine at different angles.  


My blood, sweat, and tears paid off.  
Here is the finished product:

Front view:


Side view:


Other side:


And me in it:


I love the coverage it gives me.  I love a good mid drift shirt, but this top was showing a bit too much with a pair of low cut jeans.  The high waisted skirt really pulls up the class meter on the top.  I also like how the octagons almost look like scales, giving a little nod to the mermaid in me.
I have been in a bathing suit most days soaking up the sun and playing with the kids, so I haven't had an opportunity to wear it.  Now that I have a complete outfit, I know that shirt won't spend an eternity in the closet.  

Sunday, July 10, 2016

Pants and PJ's

I've noticed that I'm kind of a bipolar seamstress.  It's either all or nothing with me.  I generally create in spurts and then spend a few weeks creating nothing at all.  When I do pick up the scissors and turn on the machine the fabric better watch out because I am a girl on a mission.  I make as many things as I can at once.

Currently, I am in a creative spurt!
:)

I've been coveting this fabric forever.  It's vintage and I love the color.  I finally got around to making myself some comfy pants:


They even have pockets :)


My mom LOVES when I make her PJ pants, so I made her some from this fabric I had in my stash for Mothers Day.  She looks happy.  I hope they fit :)


This fabric reminds me so much of the old underwear and undershirts for little girls back in the late 70's early 80's.  Remember those floral panties and under shirt tank tops?  I think they were white, but came in different color flowers?  Probably from Sears?  Anyway, I had to make a modern grown up version, so I made these for myself.  I cut the pattern for the top by using an old tank top and the bottoms are a pattern I made myself using old shorts.  Unfortunately, you don't get to see it on because it is a little to sexy ;).


My kids love my handmade PJ pants, too.  I've made these for the kids before, but Bayne grew out of his, so I made 2 more pairs in a larger size from an old sheet of his. Not that exciting, but functional and recycled/reused, which I love!


These are the less fun, more practical things I had on my table to finish.  I'm happy that they are done and I have moved on to more fun things like refashions and pretty soon a pretty new dress!  It's been a while since I made myself a dress from actual fabric yardage, then from a refashion.  

I will be sharing it all with you soon!


Thursday, July 7, 2016

Mens and Boys Jeans to Womens Jean Jacket

I love working with denim.  It's a little hard on the machine, but it's my favorite thing to refashion.

Here is my inspiration for this project:


Here is my material:

2 pairs of mens jeans and one pair of boys jeans (not pictured).


I started by taking off the pockets of one pair of mens jeans and cutting off the legs.  One leg became the front of the jacket ...


... and the other became the back.


I used the legs of the boys pants to make the arms.
I tried it on for fit.  At this point I was going to leave the arms with the finished hem of the original pants for the cuff.


I should mention that this was how I spent my 4th of July.  Watching Easy Rider, tearing up old jeans to make a new jean jacket, and enjoying a cold beer.  Freedom, baby!


I made a hood out of the second pair of jeans.  
I was eyeballing the button closer on the waist of the jeans.  That is what attracted me to the picture that inspired me, so I wanted to add that in.
I pinned it on to see if I liked it with ...


... or without.


I went with with!  


I like that it adds to the aesthetic of the raw look I went with.  As you can see, I decided to cut off the hem of the pants on the wrist cuff.  I did this because I liked the length of the bottom of the jacket as it was and I didn't want to hem it, but it looked off with the finished arm.  It gives it an overall raw feel.


Back and hood.


I love that I can button the top if I want.


Not the best on pic, but my photographers are little and my living room is a mess.


Rocking the hoodie and the closure.


I am one very happy girl!  


I love my new jacket!!!