Tuesday, April 30, 2013

Legging Refashion


This is a quick and weird refashion that requires no sewing.  

I learned this trick from one of my daughters dance teachers.  They wanted them to wear fish net stockings under their shirts for part of their costume for the recital.  She had us cut out the crotch and cut off the toes and slip the stockings on over their heads and under their shirt for a funky look.


I had these cool pair of tie dye leggings.  I love them, but I can't find anywhere in my wardrobe where they work and believe me, I have tried.  


I finally said screw it!  I'm cutting into them!
I cut out the crotch.  These were leggings, so I didn't even need to cut out the feet.


I thought it might be cute under a tank top.  It's been so cold here lately, but I really want to wear my tanks.  I slipped it on under a couple shirts ....


.... What do you think???

Is it too funky and far out??

Or just funky and far out enough to work?


Tuesday, April 23, 2013

Give Me a Break - Screen Printing with Modge Podge and Mishaps

I finally got around picking up some speedball paint so I could use my ghetto screen printing hoop and hand me down shirt.  I found the paint on sale at Michaels for $3.99.  I had a cool grey shirt at home and I new the orange would look cool on it.  I drew this design below a while back.  


To make your own ghetto screen, you just need a quilt hoop, sheer fabric, a pencil, mod podge, screen printing ink, and a ton of patience.  First trace your image onto the fabric in pencil.  Then paint glue around all the spaces where you do not want ink.  Leave the places you want the ink to print through free from glue.  Be sure not to paint the glue onto the screen when it is resting on something.  You have to rest the screen on blocks or hold it in your hand so the glue doesn't go through and stick to the surface underneath.

Once the screen is dry you can get ready to print the shirt.  I put a block of foam inside the shirt.  Set the hoop on top of the shirt where I wanted the design.  I just used an old credit card to swipe the ink across the screen several times, making sure to hold the screen down, so it doesn't smudge.

Here is how it came out.  The sheer fabric I used is really grainy and uneven, so it gives it a different effect.  I obviously missed a few spots with the glue.  I like the look regardless.


Here it is on:


There is some irony to this shirt .... I wore it while I was cleaning the house the other day.  I was cleaning the tub and when I came up from scrubbing there was orange ink all over my pants!  I freaked out thinking it was going to permanently stain my favorite pair of cords.  It washed off fine.  I started thinking maybe I didn't set the ink well enough with the iron (always a good idea to either flash dry it in the dryer once the ink is dry or iron it once it's dry to permanently set it in to the fabric).  I go look at the tube of paint to see what the instructions say and I see on the front that it is WATER SOLUBLE block ink.  D'oh!!!!  Totally didn't read that when I picked it up!  

Give me a break!

I was able to wash out the design from the shirt and the beauty of using the mod podge screen vs. the freezer paper style of ghetto screen printing is that I can just reuse the same hoop and screen, so all I need to do is by FABRIC screen printing ink, grab my shirt, block of foam, an old credit card, and I can recreate this shirt all over again.  This time permanently.  


Monday, April 22, 2013

Earth Day/Birthday Jean Refashion - Jeans to Bags

I love a good jean refashion.  It's by far my favorite thing to cut up and re-create.  My neighbor, Kevin, gave me a bunch of his old pairs.  His birthday was on Saturday and with all the Earth Day celebrations I knew the perfect thing to make for him.  Something practical he can use and something repurposed, both a gift for him and for the Earth.  What better way to celebrate both by recycling a pair of his jeans.

I forgot to take a before picture of the jeans, but you all know what jeans look like.  

Here are my materials already hacked up:


I decided I wanted to make him a little bag that he can use for his toiletries when he travels, storage, or whatever.  I found this great little tutorial.  Follow the link to learn how I went about making the pouch.


I added some fusible fleece to the back of the denim and for the lining I used a nice water resistant sport nylon fabric.  Here it is halfway through.


And here it is finished!  It's pretty cute!  I probably should have added a little tab for holding it below the zipper pull.  I added ribbon to the zipper later.


Unzipped :)


I also found another great tutorial on the same blog as the tutorial for the bag above.  It was for a drawstring pouch.  Oddly enough, I had just made Kevin a drawstring bag because he needed something for his headphones.  I wasn't really happy with how my design came out, so I figured I'd give it another shot and try using this tutorial as a guide instead.


My bag dimensions are a bit larger than the tutorials.  I had to use two panels instead of one continuous panel for the outside fabric.  I also lined it with fusible fleece, since it's for an expensive pair of headphones, I want it to be padded.  I also am adding a zipper pocket on the inside for headphone wire storage.


Here is my finished bag!


Zipper pocket and sport nylon water resistant lining.


Happy 40th Birthday Kevin.  You are a fantastic friend!


See what things you can repurpose or reuse before you toss it in the garbage can.  Everything you recycle, reuse, compost, or repurpose is a gift and a way to give back to the Earth.  We can make a difference in this disposable world we live in.  
Be creative, have fun, get inspired!  
Happy Earth Day Everyone!  

Monday, April 15, 2013

Turquoise and Neon Yellow Dress

I'm working with more free fabric again!

Here is my color palette and pattern.

The turquoise is vintage.  I really need to get to know my fabrics better.  I think it's satin?


This pattern, New Look 6723, was pretty easy to work with and very true to size.  I didn't have to make very many alterations the finished piece.  I used the same pattern design as the one on the model.


Here is the finished dress on my girl.  

I had to get it a cute matching belt :).

It's dangerous having Target within walking distance of my home ;).


I didn't want to waste the vintage blue fabric by using it as a lining, so I dug through my stash and found this perfect neon yellow.  I was never sure what would become of it and I never dreamed I would find such a fantastic place for it to end up.  I love the extra color pop it gives the inside of the dress.  


Here it is on me.


So cute and so comfy.  I'm a fan of this pattern.  I will definitely be trying some of the other styles it came with.

Tuesday, April 9, 2013

Leopard Print Retro Dress

I've been on a bit of a mission to try all of the patterns I have bought over the years.  Thanks to my great fortune of free fabric I am slowly working through all of them.  Most of the fabrics aren't ones that I would choose if I were to walk into a fabric store to purchase something for myself, but I do enjoy matching patterns that I have purchased to fabrics I have in my collection, looking for the perfect style and fit for the print.

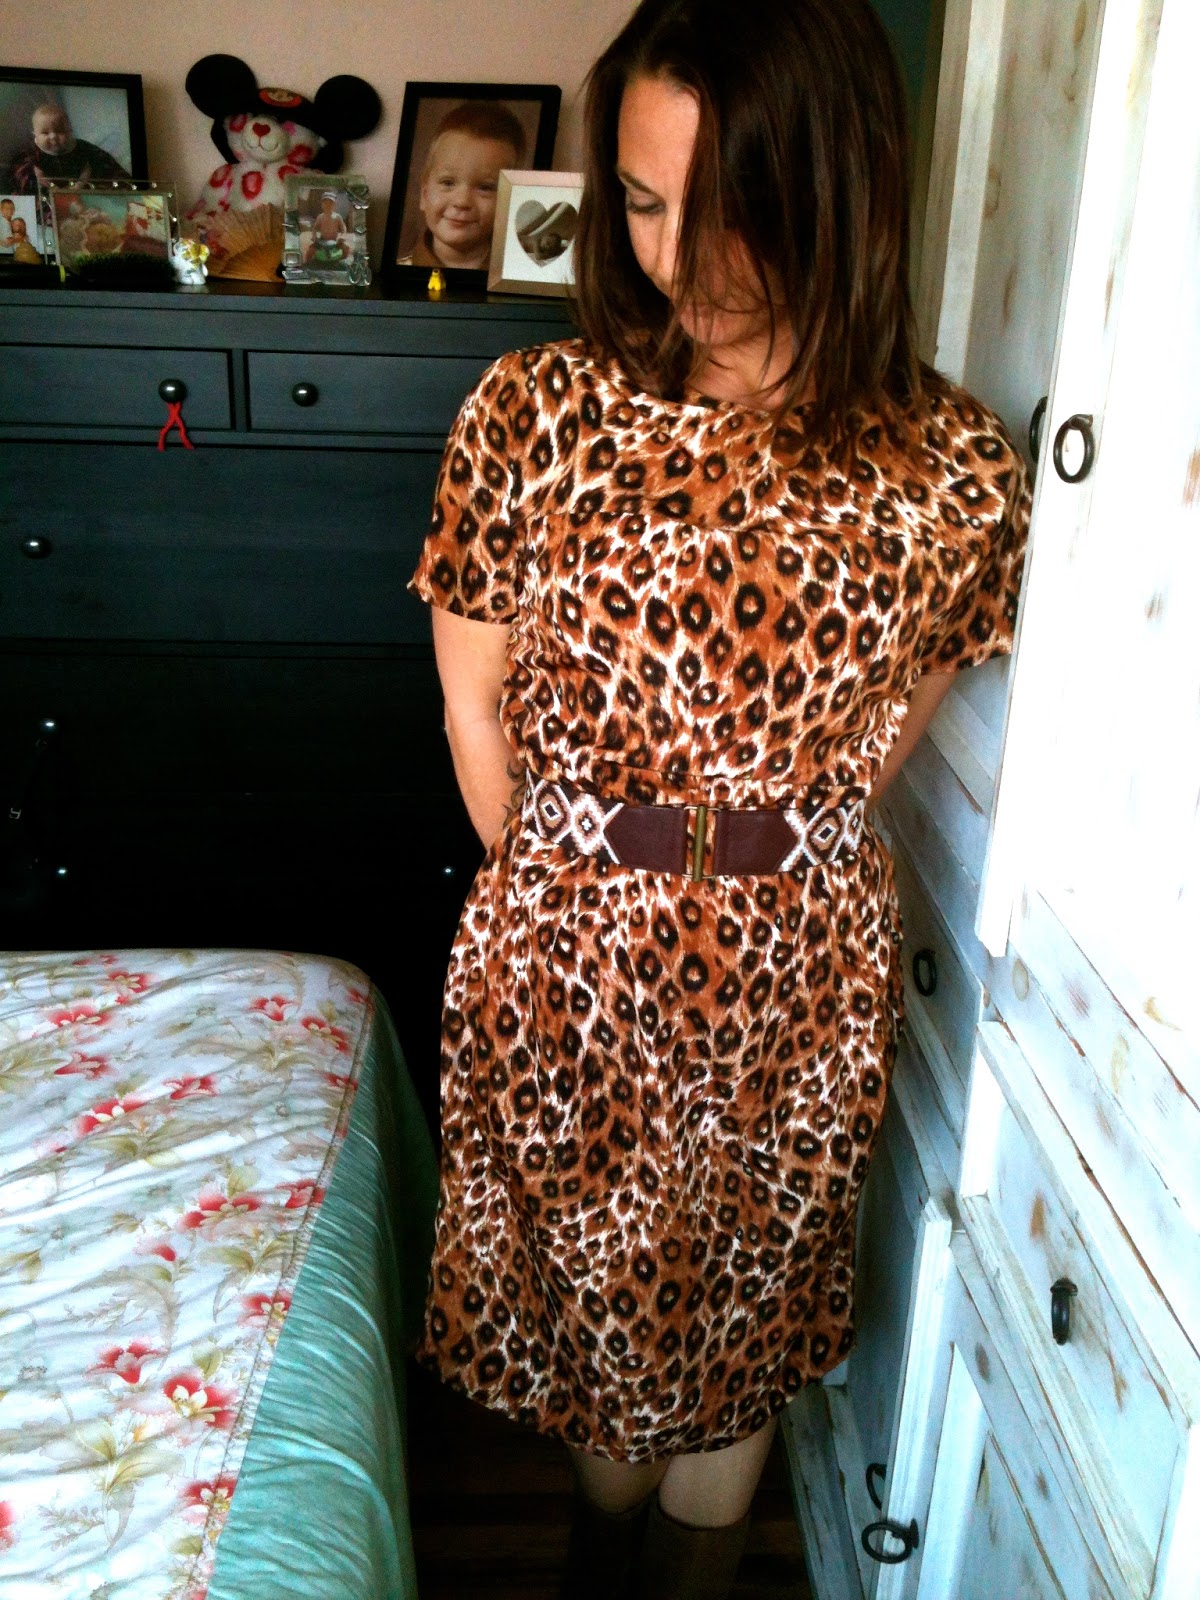
I have this cool retro circa 1958 Butterick pattern I have been wanting to try out.  I dug into my fabric stash and I had at least 5 yards of this leopard print satin (most likely) fabric.  I'm not really a leopard print type of person, but it is all the rage these days.  I thought dress pattern B would look pretty cool in a leopard print, so I went for it.


I dug around a little for some inspiration and saw these dresses below that sort of fit the style.  They convinced me that this would be a look that could work and not end up to Jane of Jungle looking.


Here is how my dress came out:


I liked it, but it felt a little long and frumpy on the bottom.  I decided to take the skirt in a bit on the sides, so it would be more form fitting and a-line.  I also took it up a little higher to knee length, so I could walk once I took it in.  I didn't want to deal with making a vent in the back, if necessary.

Here are some before and after pictures for comparison.  I tried to put them side by side, but it wasn't working out for me, so I stacked them.

Before:

After alteration:


Back before:


Back after alteration:

I think it has a better, more classic fit now.  

I used a little different styling on the before and after pictures.  I definitely need a larger black belt to go with this look and maybe some black platforms.  I am not a heel wearer, so I have mostly slip on sanuks in my closet.  I may need to get one pair of black shoes that can go with anything for special occasions. I do have a couple pairs of boots (the closest to a heel that I have) and I tried them along with a pattened belt (on the after shots) with the dress and it works, but it feels more casual than dressy and this dress is something I am more likely to wear as a dressy dress, than a casual dress.  I am glad it seems to be somewhat versatile, though, so I can dress it down a bit and get more wear out of it.

I'm pretty happy with how it turned out in the end.


  I still have a ton more leopard fabric.  I was looking at some of these other images for inspiration for the rest of it.


I really like the button up shirt.  I don't know if I would really wear it much, though.


I am more likely to wear it as a skirt.  I thought about doing a high waisted a-line.  I love the look of this:


... or just keep it simple and do a short circle type skirt.  Super easy.


I worry it might be a little redundant to the dress, though.  

For now, I am going to let the leopard fabric sleep in the drawer until I feel inspired to work with it again or a pattern speaks to me.