Tuesday, July 31, 2012

Seeing Stripes

I finished another dress!  

The fabric is from my vintage stash that I was so generously given.  I used the pattern below, which I have used once before.  I used pattern A this time.  Previously, I used pattern B.  The only difference is the sleeves.

McCall's M5804:


Hilary Duff better take it easy because, personally, this is not my idea of an "easy" pattern.  It wasn't that it is too hard to make, it's just that it is very time consuming.  The dress is fully lined inside, so it is like making two dresses.  I spent a lot of time working the fit to be just right.  When lining is involved it is best to make sure everything fits perfect before finishing any seams.  I learned that the hard way the first time around (you'll see!).

Here is how it came out!


I had to use a shorter zipper than it called for because it was all I had on hand, so I literally have to slither into it, but it fits very nicely and is super comfortable on.  I still don't know what kind of fabric this is.  It is the same type of fabric I used to make the matching dresses and pants for me and my kids.  It's pretty heavy fabric, but I like it a lot.  I used a little of the vintage turquoise corduroy that I used to make the matching peace skirts for the midriff panel.  Even the lining (grey silk blend) was from the free vintage stash.  This dress probably only cost me about $5.  It took me 2 full days of sewing (not including cutting the fabric) to construct it.

Overall, this is a good pattern.  It fits pretty true to the sizing on the back.  It is a solid dress with the lining and all.  Definitely not one you can easily undo or alter, though.  I'm not sure I will make more dresses with this pattern because of that.  Although, the addict in me could be tempted to try the alternate bodice with this pattern.  Pattern C.  I think it is the pleating and gathering "bubble" look on the tops of pattern A and B that turn me off.

I made the other style dress from this pattern, with the sleeves and the same bodice, a while ago.  Since, I have dropped sizes and I want to take it in, but I can't.  I added a bunch of fancy stitch embellishing around it, so now I cannot find a way to do it without destroying it.  Here, see for yourself:


I love the how the little stitch accents came out, but I am regretting it a little bit.  If I could get in and adjust the gathers somehow or take it in at the sides, but I just don't see that as being possible.  The embroidery stitching is solid.  If I would have top stitched around the midriff panels with a regular straight stitch, the way the pattern calls for, it still would have been a lot of work trying to get back in through the lining and outer fabric to adjust anything on the top.  You pretty much better make sure the bodice fits perfect before you add the midriff panel.  I think I did a much better job with the bodice on my most recent sleeveless dress.


Even when I was the right size for this fun, picnic-y, red and white dress, it never fit to well in the front bodice.  It was a little dumpy and empty looking.  Even Victoria Secret couldn't help me fill this baby out.  I was new to sewing at the time and I didn't know how to alter a pattern to fit as well as I do now.  This photo of me in the dress was taken two years ago (2010).  You can see the sloppy fit on the top:


The dress itself still fits pretty well in all other areas, but now that I have reduced in size the top is even more frumpy. I wish I knew a good way to take it in the front bodice without undoing any stitching.  I still really like the dress and would love to get some more wear out of it.

Maybe someone out there can help me solve my problem on the frumpy front?

Anyone have any ideas?  Please feel free to share if you do!


Monday, July 30, 2012

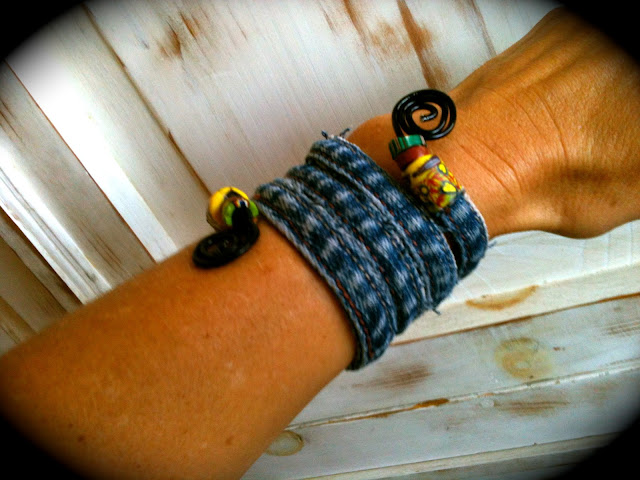
Scrappy Jean Jems

I've had way too much fun with all my denim scraps.  They just keep on giving and finding new ways to be resurrected and reconstructed into new fashions.

I saw an idea for these on Pinterest, but the link to the tutorial was spam, so I just winged it.

I used the side seams off the jeans, ran bendable wire through them, added some vintage beads (from Grandma Moses - thank you!!), and curled the ends to make cuff bracelets. 

I just love them!  


Even the kids love them.  They are great because you can form the wire to your arm.  Plus, they are easy to take on and off.  There are lots of fun ways you can wrap them.  

I can't wait to get my hands on more jeans to make some more of these!

Peace and Love Twins

As promised, here are the semi-matching peace skirts I made from some of my free vintage fabric.  The blue corduroy is the vintage fabric and I used scraps to make the appliqué.  

Here is Aubrey's:


Here is mine:


Here they are on!


Aren't we a cute pair!  We are off to spread peace and love :).

I finished my other dress this weekend.  I used some of this blue vintage fabric for the midriff panel.  I just have to pull out some basting stitches and add a hook and eye and I will share my finished product.  

Hope you have a great day everyone!

PEACE!


Saturday, July 28, 2012

Skirt Saturday!

I'm still busy working away trying to finish up sewing together my vintage stash of a fabric that I cut up into different patterns.  I managed to finish 4 skirts over the past week.  One of which wasn't part of the vintage pile, but after all my fun with denim making the rug, I was inspired.  I had a pair of really nice, new jeans that my friend gave me.  They are a very heavy weight denim.  Originally, I was going to cut them up and do something like this:


I really liked the idea of using strips of fabric to create a new textile and design something new out of it, but I'm not much of a vest person.  Then I saw this skirt:


I loved the rawness of it and the varying sizes of the strips.  I didn't have that much denim to work with, but I went ahead and used this as inspiration.  

Here are the jeans before:


Here they are after!  I turned it into a super cute jean skirt!!!  I did this with no pattern at all, except I followed the directions on a short pattern I have to make the zipper flap in the front.


Here is a glance at the process.  


I ripped strips in varying sizes from 1" to 3".  Then I sewed them together in layers starting from the largest/widest piece to the smallest/thinest piece.  


I made two of these long pieces of layered denim.  


I didn't have very much denim, so I had to try to salvage more to make it a tad longer.  It needed to have a zipper, too.  Originally I had planned to use a large elastic band, but realized quickly that it would not work with this weight denim at all.  Plus, I needed it to open up at the waist, so I could get them over my hips.  I seam ripped all the gold off and used the top band flipped upside down.  

I made a few mistakes along the way.  One was that I put the zipper flap opening the wrong direction to match with the button fly opening, which is why I had to flip the top band upside down.  Also, when I cut the front pattern pieces, I should have folded one of the long pieces of layered denim in half and then cut.  I think I cut one front piece out of each long piece of fabric, so I ended up having a seam in the center back, which wouldn't have been necessary had I cut the front pieces out of the same long piece of  fabric.  Nothing that had any dramatic affect on the outcome, though.


My button and zipper fly.  I'm really proud of this!  I struggled with this the first time I made shorts.  It made much more sense this time through.


I am really pleased with this creation!  I love when I can turn one thing into something else, especially if it increases in coolness.  I also love creating my own design.  I rely heavily on patterns, but they have taught me so much.  It feels good when I can actually see that all the information is sinking in.

So once again ... here is the front (I had a little fly away string I forgot to trim, please ignore).


Back - You can see the unnecessary seam down the back :(.  Oh well, no biggie.  Since, I have added one more strip to the back panel.  It's all I had left and I wanted just a tad more coverage.  I definitely wear bike shorts under this baby!  Sorry boys!


On me!


The other skirt I made is part of my vintage fabric fabrics.  It is a weird wool knit fabric.  It's not the best fabric in the world, but my goal was just to make something with it.  And I achieved my goal.  

This fabric does not photograph well, my apologies.


For some reason it came out long on the sides, more than the front and back.  I think I did a poor job cutting (I cut all this fabric up into patterns over a year ago) and also the knit may have stretched a little when I was doing the hem.  I actually kind of like it.  It is hard to see in the photo, I think.  It gives it a little more style.  Mostly this is just going to be a comfy, easy wear skirt.  The fabric already wants to lint up everywhere, so we will see how many miles this gets.  The other shirt I have waiting to sew is in this fabric.  It is going to be a long sleeve button up for Bayne.  I hope it goes well.  I'm still learning my knit skills.  Anyway, here it is on:


I have two more finished skirts to share, but it will have to wait until tomorrow!  I made semi-matching skirts for Aubrey and I, but she is with her Pops today.  He was nice enough to give me an extra day off to catch up on my sewing.  I'll try to get a picture of the two of us sporting our cool new skirts tomorrow.  

I'm about to get back to work on a dress right now ...  

Wish me luck!  

Friday, July 27, 2012

I Got The Blues

Blue Jeans that is!  

Lots of old worn out ones that no one wants to wear any more.  

I also have scissors.  Real sharp ones!

So snipping and ripping I went.


I ripped them all into 1" to 2" strips.  I did my best to divide them into three different shades of blue.

I sewed a few strips together, so I had three long strips of denim to work with.

I folded each strip in half, wrong sides together, to hide the back side from view.

I sewed the three folded strips together at the top and then started braiding.


I kept adding strips to the braid as I went to keep it from tangling as I went along.

After it was all braided I sewed the three folded ends together.  

I ran this through the sewing machine connecting the braids with a zig zag stitch because I was trying to rush it, but I recommend doing this by hand with it flat on the ground.  It curled up on me and I've been trying to weight it down to flatten it for almost a full day.  I almost had to rip out all the zig zag stitches and re-do it by hand.  I think I finally got it to lay flat.

Here is the end result!


Now I have a nice braided denim rug for my feet to stand on while I wash dishes in the kitchen and our old denim jeans have a whole new life. 

You can use this technique to make a variety of different things.  Rugs, baskets, bags, bowls, cozy's, and more!  It's a great way to use up any old, undesirable fabric scraps you don't know what to do with.


Wednesday, July 25, 2012

Pac-Man Fever

We love video games in this house.  My kids are all into the Wii, but I like to kick it old school with some good old classic Pac-Man!

I love that game!  I miss my Atari.

My kids think it's pretty cool, even though it's a little hard for them to play.

Does anyone remember the Pac-Man cartoon from the 80's?  I used to love that show!

I felt motivated by my children's interest in one of my favorite video game icons, so I dug through my stash of fabric and whipped out a Pac-Man for each kid.


I was only going to make one, but I sewed the eyeball up side down on the opposite side, so I just added some gingham to the back and made two instead.  It's always better to have one for each kid, if you can do it.


Pac-Man would not be complete without a Power Pellet!  

I think we are going to make the ghosts next!  I have some red and blue fleece, but I'll need to find some orange and pink off the remnant rack at Joann.

The kids have already decided.  Bayne gets the red and pink ghost and Aubrey gets the blue and orange ghost.


Do you have Pac-Man Fever?

Shirt I Didn't Scrap

In a previous post, I mentioned a shirt I might scrap completely.  It was out of my vintage fabric that are cut up and ready to sew pile.  Well, I don't give up easy and I'm glad I don't because I didn't and I just love it.  Here is the pattern I was working with:

Simplicity 2415


I chose this pattern because it doesn't require much fabric and I only had a small amount of yardage.  Because I had limited fabric, I couldn't include the floral pattern into the center of the shirt in any way, so I had to move it to the side and it looked odd with all the blue in the center.  The front and back panel are supposed to be one whole piece, but I had to cut the back into two halves, so there is a seam where it shouldn't be.  Basically, when the pieces were cut and laid out if front of me, I just did not see how it was going to come together into anything wearable.  I love this fabric, though, so I had to give it a shot.  After all it is vintage.  When it's gone, it's gone.  

So I was determined and I believe I was successful in making, not only something wearable, but something really darn cute!


I added elastic to the bottom.  The pattern doesn't use that, but I loved the way they did the casing on the neckline so much I wanted to do it again on the bottom.  The big, empty feeling, blue space in the center shrunk with the elastic.  


The flowers on the side worked nicely.  I almost think it's better to have them on the side than in the front in the end.


The trim I found to cover up the seam line in the back.  

I was so worried I wouldn't be able to cover this.  I think the fancy trim does the job nicely.  It blends right in with the shirt and doesn't stand out too much.  It looks like it belongs.  It also has a vintage feel to it.


I swear my grandmother wore something made from this exact fabric.  It looks familiar, or has a familiar feel to me.  It is definitely something my grandmother would have loved.  Turquoise was her favorite color.  It happens to be mine, too!  This shirt is quickly become a favorite, as well.


I think I will be wearing this a lot!  Probably making plenty more, too.  It is so easy and comfortable to wear.  


The pattern is very easy, too.  I highly recommend it. There were a couple tricky parts with the sleeve, but I just had to read the directions a few times through slowly.  I love their method of using single fold binding to help create a hem and casing for the elastic on the top of the shirt.  I plan on adopting and using that method for now on when I can.  

New trick, new shirt, no scrap!
Success!!!