Sunday, January 27, 2013

Vest For My Best Boy

I try to never take the kids along with me to Joann's for obvious reasons .....


.... but more often than not I have to.  They were really getting into it on this particular trip.  Aside from browsing through the fleece section, they also had fun price checking the thread while I was searching for the zipper I needed.  Bayne stumbled upon this really cool golden spool of thread.  He told me he wanted me to make something for him with it.


Challenge accepted!  With only a golden spool of thread as my inspriation, I set forth looking for an idea.  I was thinking something denim at first.  I have lots of old jeans I could cut up and piece together into something cool.  I was leaning toward a vest.  I had found this cool one on pinterest.


I love it and the lining is cool.  For whatever reason, I didn't feel like making this a refashion and instead dug through my fabric stash for something new to work with.  I had this cool heavy duty brown hemp canvas.  I used one of Bayne's vests to make the pattern. 


I decided on using the blue organic cotton/hemp/lycra fabric I used in the recent dress I made for the lining, since I had so much left over.  I added a nice fusible fleece to both fabrics for warmth and cushioning.  In retrospect, it might have been best if I only used a single layer because his only complaint is that it's heavy. 

I sewed the golden thread as an accent across all the seams and edges of the jacket (I kept the inside thread blue, though).  I think it looks really nice with the brown and blue.  I found a super cool zipper that matched perfectly.  I think it looks so cool on him.  I'm way proud of this creation because I was able to make it without a real pattern and only a spool of thread for inspiration.

Here is my little stud muffin with it on.


Saturday, January 26, 2013

Shirt and Skirt Refashion

I got lucky again!  My neighbor brought me a bunch of clothes a friend of hers was giving away.  A lot of stuff was my size and she knows how much I love fabric, regardless of it's form.  I dug through and found quite a few cute things, a couple of which screamed - REFASHION!!

This shirt stuck out right away.  I like the print and I wanted to like the shirt, but the collar was awful and the sleeves even worse, especially with the black binding.  Plus it was a little too big for me, so it was poorly fitted.  This dress form is a size larger than me, if that gives you a sense of how baggy it was.


Then I got this skirt.  It's not really my style, but it never hurts to have a black skirt in your wardrobe.  I hated the length, so I decided I'd chop it.


For the shirt I took out the pleats on the bottom half of the front of the shirt.


Then I undid the seams on the sides, collar, and bottom hem.  I re-sewed the sides to be more form fitting.  I had to raise the bottom of the shirt up a tad to make it even (since I took out the pleats, it left it uneven).  I re-hemmed the bottom and the top.  I also took off the sleeves and enlarged the arm hole just a tad, since I lost some of the width when I took in the sides.


For the skirt, I just measured where I wanted it to land on my thigh and cut, pressed, hemmed it in place.  Easy peasy.


Finished skirt


Finished top and skirt on my dress form.  It could even work as an outfit.


I think it came out nice.  I'm really happy with the top, I know it will get lots of wear.  The skirt it remains to be seen, but at least I have a nice black skirt if I need one.


Wednesday, January 23, 2013

Blue Organic Hemp meets Vogue

I finally got around to using up the gorgeous blue organic cotton, hemp, lycra jersey fabric I got from Hemp Traders.  

Actually, I still have a bunch left because they were kind enough to send me an extra yard for free.  Love them!

I also have had this pattern for a while and it needed a stretch fabric and the blue organic cotton/hemp/lycra was perfect.

Very Easy Vogue V8571


Here is the finished dress!


 This fabric is so comfy!  I could sleep in it.  The pattern was very easy to follow and make, too.  It didn't take too long.  I probably could have done a better job with the gathering, but it looks fine as is.  I used my serger.  Man, that thing is great!  I can't wait to get to know it better.  It definitely finished this dress in record time with none of the puckering that my regular machine would have caused because of the stretch fabric.  I plan on taking my regular machine into the shop because I recently dropped it on the hard wood floor - D'oh!  It seems to be fine, but I want it to get checked and cleaned anyway.  While it's gone I plan on developing a better relationship with my serger and really get to know it better.  It seems amazing.  I can't wait to master that bad boy.

Spring is coming .... I can't wait to wear all my new dresses I've made over the winter.

Monday, January 14, 2013

Refashion Project - Jeans and Mens Shirt to Cool Dress

I don't know what came over me, but recently I saw this shirt hanging in my closet and I felt the overwhelming need to refashion it into something else.  A guy friend of mine gave it to me along with another one just like it in blue.  Which I refashioned into this dress here.  I wasn't planning on doing anything with this one because I liked wearing it around the house at first, but lately, it has just been hanging there.  


I also had this pair of jeans from him that I took in the waist on, which you can see in the same link/post that I posted above.  Maybe that's why I felt they should go together. 


I wore them, I liked them, but I didn't love them, so if a good enough idea came along I would be willing to sacrifice them for the greater good.  

My idea began slowly.  It was formed by the fact that the shirt wasn't very big, so I had a minimal amount of fabric available.  The same went for the jeans.  (Note to self:  I need larger, fashionable male friends).  I decided to cut the shirt into 3 1/2" x 5 1/2" rectangles.  The reverse side of the fabric is a really nice striped print, too.  I used it for accents in the other dress I made.


I sewed it into stripes, alternating front and back fabric, to a width of the largest point of my hips.


I ended up making one front panel and two back panels.  I knew I was most likely going to need a zipper to add width to the skirt, since I had barely enough fabric to work with.  This is as wide/long as I could make.  


Due to the fact I had very small panels, I thought it would be best if I made a dress out of it instead of a stand alone skirt, so I didn't have to figure out a waistband.  I dug through my pattern stash for some bodice ideas and I decided on this one.


I made this dress with this pattern, so I was familiar with the pattern.  It's not too hard to work with.  I thought it would look really great in denim.  Here is a little preview of the bodice with the top strip and skirt pinned to the dress form for a little sneak peak (for you) / idea formulation (for me).  I was feeling pretty good about things at this point, so I went forward.


My only trouble was I didn't have enough of any fabric left for the straps and then it dawned on me that I could use the waist band of the jeans (that I worked so hard on taking it in).  There was just enough, when cut in half, to make up each strap.  


I undid the whole seam of the bottom of the waste band and took out the remnants of the denim I had cut off.  I took of the belt loops and then re-sewed the strip.  I put two lines of stitching on each end, just because the bottom had two lines originally sewed on it and I wanted each side of the strap to match.

Here is the finished product.  I wanted the skirt to be fitted, I didn't use a pattern for that, just the dress form.  I considered gathering it at the waist, but I think I made the right decision to go form fitting, since it was going to be tight at the hips.  I think it looks smooth and clean fitted.


I used the existing seam line on the inside of the pant leg in the center of the dress, which worked nicely. 


I decided the reverse side of the shirt fabric looked best for the bodice top piece.  


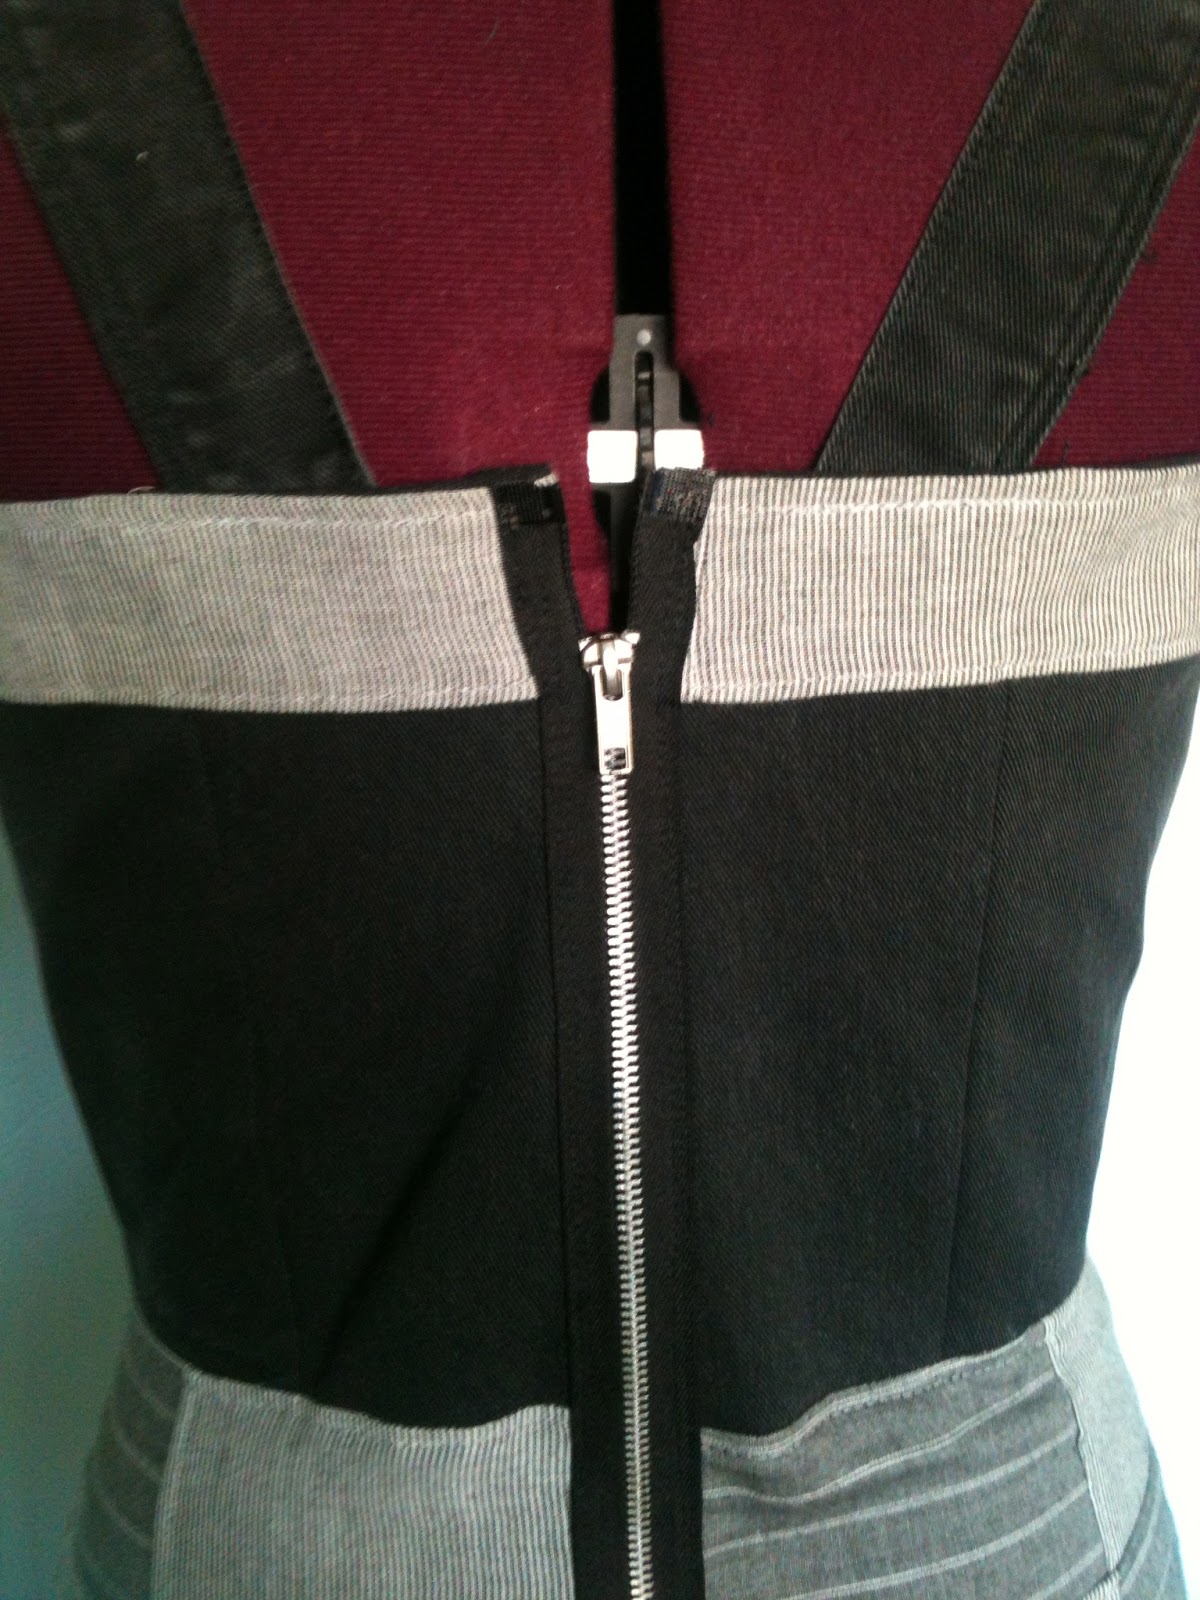
I've been wanting to make something with an exposed zipper lately.  This was the only part of the dress I had to buy.  They had the perfect size!  I didn't have to do anything to it, just sew it on after finishing the edges and folding them under once.


For the hem (I didn't get a good photo), I had very little fabric left to work with.  I ended up cutting a strip of 4 alternating rectangles and cut it in half the long way.  I pieced it together to match the same length as the skirt, folded it in half and sewed it to the bottom of the skirt for a finished hem.


I ran two lines of stitching down each side of the zipper.  I also added interfacing to the skirt (not the bodice since it was heavy denim) to the part that is hidden under the zipper for extra stability, since the fabric is so light weight.  I didn't want it to warp or pull.  I also top stitched over all the seams in the skirt.  Each panel, the hem, the side seams, and the waist all are top stitched and tacking down the seams underneath.

Well, here it is on ...


What do you think?

I'm digging it!

I recently re-arranged my tiny room by adding yet another dresser to house all my fabric, so I barely have any room to take pictures anymore.  I really need to get sewing and burn through this fabric I have, since moving into a bigger place isn't really an option!

Now if the weather will warm up...
- - -it's dropped into the low 30's here in sunny Southern California, BRRRRR!!!! - --
... then I could wear this cute little number somewhere fun.  Who knows where?  I'm excited at the prospect of a warm day on the horizon in which I will.

Sunday, January 13, 2013

Harry Potter Party #2: The Chamber of Secrets

We finished our second Harry Potter book in the series on Friday night!


Which means ... Movie viewing party time!


I made the kids this cool cake.  It's a chocolate beet cake.  I'm always happy when I can sneak some veggies in with the sugar.  On the cake I wrote, "The Chamber of Secrets has been opened", which was written on the wall in blood in the book (and movie) after the first kid was petrified.


We did another fun craft with pinecones this time.  At Hogwarts School of Witchcraft and Wizardry, each kid has one pet that delivers messages for them.  They can have either an owl, rat, or frog.  So we each made one of the animals for ourselves.  We just stuffed pom-poms into the spaces in the pinecones.  I didn't have too many on hand, so we worked with what colors and sizes we had on hand.  We glued down the pipe cleaners and eye balls with hot glue.  Really fun, easy craft.

Bayne is making an owl.


Aubrey is making a rat.


I made a frog.  Here are our finished pinecone pets!


Another fun Harry Potter Party!!!  Both kids have been doing a lot of pretend play with their stuffed animals and wands, acting out different scenes and doing spells.  I love how much these books and movies have inspired their imaginations.  

Everyone is excited about book three.  I better start looking for some fun new ideas for the next party!