Saturday, November 23, 2013

Novelty Print Winter Holiday Dress

I have yet to make myself a Christmas dress. 

I know, I find that surprising, too.

I have made a couple Christmas skirts to match with Aubrey.  Like this cute, blue, snowflake matching outfit we have on here.  I still have this skirt (I had to take it in a little) and I made a larger dress for Aubrey, so we can still rock our winter wonderland look together for a few more years.


I also made these crazy candy cane skirts to match with Bayne for one of his hip hop recitals.


It's worth showing off the back of Bayne's shirt.  I did his angel wings with freezer paper and gold glitter fabric paint.  The song they danced to was "Halo", by Beyonce.  He was the only boy and they didn't have a costume for him, so this is what I came up with.  He was so little and so cute!


Ok, back to me and my first handmade Christmas dress.

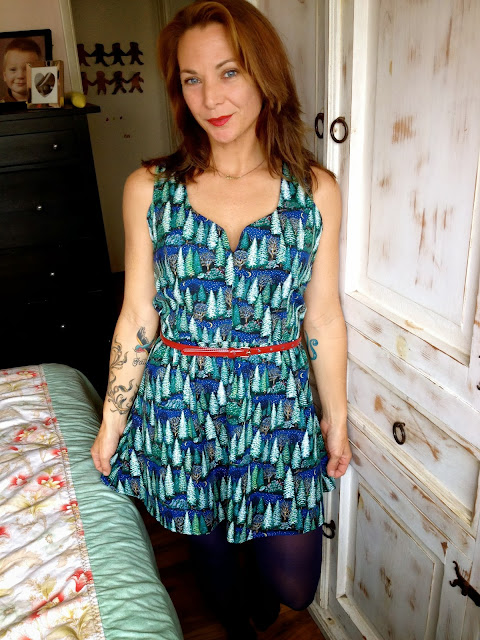
I was given this cool, starry night, Christmas tree fabric.  I love the blue, the subtle red highlights in the bushes, and the crescent moon.  The trees, the snow, the stars … ok I love pretty much everything about this fabric.  Especially that it was free!  I should tell you that I am a sucker for novelty fabric.  I don't care that it may be a little young to wear cute prints.  I think they are fun and playful.  I guess that would be the definition of young.  I may not be "young" per say, but I am young at heart and I like to be a little young in fashion, too.  If you can't be playful with your clothes, then why even get dressed.  Am I right? :) 


I pictured this being a 3/4 sleeve, button up dress.  Unfortunately, I didn't have enough yardage to pull that off, especially with the one directional print.  I dug through my stash of patterns and this was the best I could find to work with.  I went for pattern D, since I haven't tried that cut yet.  I figure it can be worn with tights and a cardigan in the winter and still look pretty cute, even though it is more of a summery style dress.


Here is my first handmade Christmas/Winter dress for me all finished!


I threw a little red belt around it and some dark blue tights.


Add the cardigan sweater for some warmth.  I like how the bodice top still peaks out of the collar a little.  I like to wear it with my red Toms.  


I'm pretty happy with how it came out.  I think I will be wearing this one quite a bit this season!  

Just a side note, I noticed that this was my 100th post.  Kinda cool!  I guess that means I have made at least 100 things since I started this blog.  Although, I feel a little lame at times for having this blog, I am glad I started it.  Mostly, I like having all my creations in one place for easy reference.  That way if I ever want to use a pattern again I can check back on here for notes or tips on ways to avoid mistakes or make it better.  I wish I could be as cool as some of the fashion bloggers out there that take the time to go out and capture beautiful images of their creations on them out in the world.  I have a hard enough time getting a picture in my room.  I've never been one for being in front of the camera.  I figure if I can wear it outside into the world, then I can suck it up and take a quick picture to share with everyone.

Thanks for keeping up with me and my work!!  


Monday, November 18, 2013

Santa Claus Is Coming To Town


It's that time of year again!

Time for the holly and the jolly.

And the cute Holiday clothes.  

It's always so easy to find a cute Christmas outfit for a little girl, but it's much harder to find one for a boy and a tomboy.  Especially one that THEY will think is cool and want to wear.  

I created this clever little Santa Mustache shirt for my kids.  This is my fun holiday spin on the whole mustache fad that I've never understood.

I made one for my daughter this year.  The kids have more fun with these shirts.


Bayne likes to pull his up to his nose so it looks like he has a mustache.


Of course, Aubrey has to do it, too.


She's going straight for the candy cane up the nose … lol!


I do have a few of these awesome Santa Mustache shirts available for sale on my Etsy page.

I have several holiday items available for sale.  Dresses, hot pads, coasters, and Thanksgiving table settings.  I included links to the listings if you find yourself interested in any of my holiday creations.  


I love this Holiday SnowFlake Dress.  
I like the uniqueness of the dark fabric against the snowflakes.


My daughter wears one of these and I have a matching skirt.  It looks so pretty on with a pair of white tights or leggings and a long sleeve shirt.  She looks like a beautiful snow princess when she wears hers.


I have these gorgeous hand braided hot pads to dress up your table for the holidays.


And also this Set of three hot pads.


And tons and tons of holiday coasters sure to brighten up your home and keep your tables free from water stains.


I even have something for Thanksgiving.  Cute little pumpkin and scarecrow placemat and napkin set perfect for the kids table.


Thank you for taking the time to look at all of my creations.  I hope you find something special for someone you love.  Everything I make I do so with great care and love.  Every purchase goes towards a good family and supports a real dream.  

Good luck with all your holiday shopping!  
Happy Holidays!!!

Wednesday, November 6, 2013

Under the Sea Skirt

I have had this pretty piece of fabric hiding in my bin for a while now.  It is a vintage piece.  Very lightweight, silky fabric, and the print is amazing.  I love the under the sea theme.  Perfect for this surfer girl.


I didn't have very much of this fabric.  Maybe a yard and a half or less.  I didn't want to cut into it too much, since this print is one of a kind.  I decided to cut it in half and turn it into a long, flowing skirt.  

I recently made a trip to Joanns for some supplies and I happened upon the foldable elastic.  I remember pinning a blog post about how to use it and it looked like a super simple way to make a skirt.  I grabbed some for fun, and that is pretty much what inspired me to finally do something with this fabric. Here is the blog tutorial I used for inspiration and tips to using the fold over elastic.  I didn't follow her tutorial exactly.  I kinda went my own direction with it, which I will explain as best I can.

First, I cut the fabric in half.  I serged the two side seams together and then serged the top and bottom edges to finish the fabric and make it easier to hem and pin to the elastic.  I didn't want to cut the fabric, so I did not cut mine more narrow at the waist.  I left it as two rectangles and then I gathered the top.  

Next, I cut the elastic to fit my waist.  In hindsight, I would have really stretched the elastic around my waist to get a more snug fit.  I only stretched it a little when I cut it to my waist size and now that it is finished I realize it could have been a tad tighter.  Just something to keep in mind when you cut the elastic.  Then I sewed the elastic ends together, making a closed circle.  I pinned the fabric in four places around the elastic to start.  Center, side seams, and back.  Moved the gathers around a bit to make them even and then pinned in four more places, between the other pins.  You can use more if you want.

Once I had everything pinned, I moved it to my regular sewing machine and sewed it to the elastic using a medium long (3.0) stitch, stretching the elastic as I go to make the fabric line up just right.


I switched my machine over to a long zig-zag stitch, folding the elastic over and down as I sewed. 


Here is how it looks close up once it is folded over and sewn.  My poor fabric has some holes now from where I pulled out the gathering stitches.  Oops.  No one will see it, though.


Then I folded up the hem, just a hair, and pressed it in place.


And sewed it.


It's not the prettiest finish, but it was a very fast way to make a skirt.  I finished this project in under 2 hours.


Here is the finished product:


It probably isn't the most flattering skirt in the world, but I love the print.  It feels so light weight and comfortable to wear.  I slipped this outfit on after I got done surfing.  I like that I can still feel like I am in the ocean, even when I am out of the water.  

I'm a bit of an ocean freak.  I often feel more at home and sure footed when I am in the ocean on my body board, than I do when I'm on dry land.  Now I can take a little of the sea with me and maybe it will help to keep me grounded throughout my day.

Now I want to go surfing … maybe I should put on my new skirt!

Saturday, November 2, 2013

Mens Dress Trousers Transform to High Waisted A-line Skirt

I recently refashioned a skirt into a crop top and while I loved the outcome, I felt like it needed a high waisted A-line skirt to carry the look.  I had the perfect pair of mens grey dress trousers.  They had a nice stretch and the color was a good match.

Here are the pants on to get an idea of size.


I turned the pants inside out and cut out all of the lining in the legs.


I decided to use a new pattern I haven't tried yet.  New Look 6053.  I used pattern A.


I pinned the pattern to the leg of the pant and cut as best I could.  I definitely had to alter the pattern a bit by narrowing it near the hem.  I added a vent to both sides of the skirt to compensate for this.


I cut the facing for the waist band from what remained of the pants.


Sewed it all together and adjusted the fit a few times to make it just right (or close enough, anyway).  

Here is the finished skirt with the top I recently refashioned.


It has a little side zipper.


The center front and back have a seam line running down them from the side seam of the pant leg, but luckily it is very hard to see.


Little side vent at the bottom of the skirt to make for easy movement.  


I just need to throw on a pair of cool black tights and a nice jacket and we are good to go!

The skirt is surprisingly comfy and easy to move in.  I will definitely do another refashion like this in the future if I get my hands on a nice pair of trousers.  It's possible I may even have a black pair waiting in my refashion pile.  

Wouldn't that be perfect?  

I bet you'll hear about it if I do!